INN KITCHEN COMFORTS

Standard

More than 40 followers of my blog took a readers’ poll that I recently issued.  Although the responses indicate a diversity of interests, the message was clear: you want to read more tales about the Combes Family Inn, and you want me to throw in a bit about my travels, past and present. And, you want me to move past my “dry year” and associated diet and exercise journaling. Accordingly, I’ve put the innkeepers on notice that they need to dust off more of their apocryphal stories.

Blog Reader Poll Results

(The top vote-getters from the reader’s poll were Vermont Inn-Trigue, Travels, and My Memoir.)

While we await a few more “Vermont Inn-trigue” inn-keeping stories, I’ll share several of Mom’s famous comfort food recipes that she recently made for a dining room full of skiers. The menu included three of her most beloved winter recipes: broccoli soup, pork schnitzel, and homemade apple sauce.

Perched on the precipice of spring, we’re alternating between days of snow melt, mud, and rain, and nights (and some days) of freezing temperatures, ice, and snow flurries. This is a great time of year to enjoy comfort foods, in winter’s last hurrah before spring fully arrives, bearing both warm weather and fresh fruits and vegetables.

For the first course, what else but Ruth’s famous broccoli soup, a dish that has been on the menu since the inn opened in 1978? This treat, coveted by both family members and long-time guests alike, has transformed through the years.  The original recipe featured cream, butter, and chicken stock, and had relatively little actual broccoli.  The new one, as you’ll see below, is decidedly different, but it still tastes absolutely delicious.

Mom Dad soup

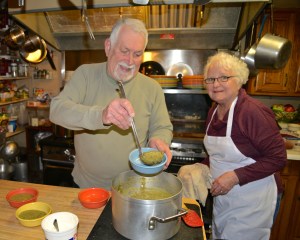
(Vermont inn keepers Bill and Ruth Combes are still dishing it out in the inn’s kitchen after 37 years.)

CFI’s Original Cream of Broccoli Soup

Ingredients:
2 tablespoons butter
1 medium onion, chopped
1 celery stalk, chopped
3 cups of vegetable or chicken stock
8 cups of broccoli florets

3 tablespoon butter
3 tablespoon of flour
2 cups of heavy cream
pinch of ground pepper

Method:
Melt 2 tablespoon of butter. Sauté celery and onions until tender. Add broccoli and broth. Cover and simmer for 15 minutes.  Puree, using an immersion blender or a regular blender. In a small sauce pan, melt 3 tablespoons of butter, and stir in flour and cream.  Stir until thick and add to the soup. Season with pepper and serve.

My mom explains the transformation of her broccoli soup this way: “About 10 years ago, I switched to my current recipe, because our guests were looking for healthier food and, frankly, so was I. My current recipe is all broccoli, basil and garlic, with a little olive oil. I actually got this recipe from Joe, the inn’s refrigerator repairman, who happens to have a large garden. Many of his recipes feature garlic, because he grows a lot of it; this recipe is no exception. My only modification from Joe’s original recipe is that I typically use only olive oil, whereas Joe preferred butter.”

Broccoli soup has always been Mom’s signature soup. Now, it’s just healthier and more flavorful. This is Joe’s recipe, which, as Mom notes, freezes very well.

Joe’s Basil and Broccoli Soup

Ingredients:
5 cups coarsely chopped broccoli
2 cups chicken stock
3 tablespoons of olive oil (Joe suggests a combination of butter and olive oil)
¼ cup fresh chopped basil (when fresh basil is unavailable, tubed basil paste works just fine)
3 cloves garlic, chopped
Salt & pepper
Lemon juice

Method:
In a saucepan, bring broccoli and stock to a boil. Lower heat and simmer until broccoli is tender, about 45 minutes to an hour. Purée broccoli and stock with an immersion blender, food processor or blender, until smooth. Heat oil and/or melted butter in small saucepan and sauté garlic and basil briefly, until garlic turns brownish. Blend with about 2 cups of purée and process until smooth. Stir into soup. Season with salt, pepper and a squeeze of lemon. To serve, sprinkle with Parmesan cheese or a dollop of sour cream.

Broccoli soup

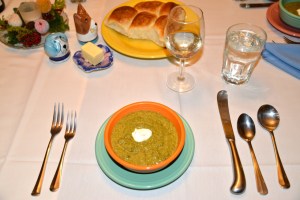
(The leaner, meaner version of Ruth’s broccoli soup, served with a dollop of Cabot sour cream.)

The entrée course featured pork schnitzel, simple noodles, and homemade apple sauce. Unlike the broccoli soup, Mom never made schnitzel when I was growing up in the inn, so I asked her to tell the story behind this recipe.

“We went to Germany in the early ‘90’s to visit [our son] Wayne, who was stationed there in the Air Force,” Mom said. “When we got back home, your father said we could write off the whole trip on our taxes, because we had brought back this schnitzel recipe, which we’ve been making ever since.”

She also explained that, in addition to being absolutely delicious, this is a very cost-effective, high-protein main dish. My father buys the pork in very large loins when it’s on sale and then slices it into several thin cutlets, which can be used immediately or frozen. The recipe below has its roots in the dinners my parents enjoyed in Germany while on vacation and is a modification of the pork schnitzel in a German cookbook purchased on that trip, combined with the method Mom uses to make her famous “Frenchie’s Chicken.”

Dinner is served

(The main course of pork schnitzel with homemade apple sauce, simple pasta, and green beans about to be served.)

Pork Schnitzel

Ingredients:
4 pork loin cutlets – either boneless pork chops or slices from whole pork loin, about 1/4 in. thick
¼ cup flour
½ cup panko bread crumbs
1 egg beaten with a couple tablespoons of milk
¼ cup butter
¼ cup vegetable oil

Method:
Pound pork loin between sheets of plastic wrap until 1/8 inch thick. Melt butter and shortening in frying pan. Put the above flour, panko and beaten egg each on individual plates. Dip both sides of pork cutlets in the flour, the egg, and the crumbs, in that order. Fry in pan until golden brown on each side about 2-3 minutes per side.  Keep in slightly warm oven until ready to serve. Or keep cold and put in 400 degree oven for 5 minutes or so before serving. Serve with apple sauce.

When asked about the secret to the recipe, Mom dished out three: “Cut and pound the pork as thin as you can. You have to use panko and not regular bread crumbs. And, it’s the homemade apple sauce that absolutely makes the recipe.  Also, the secrets to my apple sauce are: apple cider, extra cinnamon, and using a food mill, to crank through the apples. Oh, and there’s another secret to the apple sauce:  I use the whole apple with the stems and everything.”

Mom for apple sauce

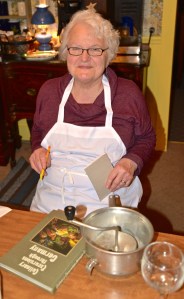
(Inn keeper Ruth Combers shares some or her cooking secrets, including a German cookbook purchased on a trip to Germany and her trusty hand-operated food mill.)

Ruth’s Home Made Apple Sauce

Ingredients:
5 lbs. of regular McIntosh apples
1/4 cup water, apple cider, or apple juice
1 tablespoon lemon juice
1/2 cup brown sugar
1 tablespoon cinnamon

Method:
Slice apples. Do not peel or remove cores. Put apples and liquid in large covered pot and cook over medium flame for about 1/2 hr. or until apples are tender. Put apple mixture through a food mill. (“This is a great kitchen gadget, especially for pureeing soups and vegetables,” says Innkeeper Ruth.) Add lemon juice, brown sugar and cinnamon. Apple sauce can be frozen.

Needless to say, dinner was absolutely delicious. That’s all…for now. Tune in next week to find out how Innkeeper Bill fared after two, individual, day-long bread-baking classes at the famous King Arthur Flour’s Baking Education Center, up in Norwich, Vermont.

Advertisement

Breakfast with the Vermudgeon

Standard

Thus far, the “Vermont Inn-trigue” thread of my blog has mainly contained stories that revolve around my mother, Ruth Combes. She is precisely one half of the dynamic duo of innkeepers that have kept this business going for more than 36 years. I am overdue in writing specifically about the other half, my father, Bill Combes.

Since the beginning of this long adventure, Dad has been the inn’s handy man, head purchaser, waste manager, and, most famously, breakfast chef. It’s for this last role that he is beloved by guests, and it’s the sole subject of this post. Also of note is the fact that my mother is not a morning person, so my father’s contribution as the breakfast chef is fundamental to inn guests getting the second B in B&B. Given the amount of rich material on the topic, it will certainly lead to at least two additional blog posts.

Before observing and interviewing the breakfast chef this morning, I did a quick check in with my mom, asking her to describe my dad’s charm as a breakfast chef. Her response? “I haven’t seen his charm at breakfast,” she replied matter-of-factly. “His style is to be grouchy.”

IMG_5922IMG_5926IMG_5927

You wouldn’t know it this morning. First of all, today is Sunday, signaling that, as tradition dictates, pancakes are on the menu. On other days of the week, various breakfast meats in combination with eggs, and sometimes French toast, appear on the breakfast menu. But every single Sunday morning it’s pancakes and sausage. And Dad’s pancakes are as legendary as they are delicious.

Many times through the years, guests have asked my mother for Dad’s pancake recipe. And she has consistently handed out a recipe that is not my father’s. She doesn’t do this to be deceptive. She does it because she doesn’t know the recipe. This morning, Dad was happy to walk me through the bona fide recipe, as well as some of his other breakfast secrets, eliciting this response from Mom: “I did not know that.”

Well, now you do.

Bill’s Famous Pancakes

Ingredients:

One box of Jiffy Corn Muffin Mix.
8 cups of your favorite Buttermilk Complete Pancake Mix (Dad prefers
Krusteaz, although any brand will do).
2 teaspoons of cinnamon.
Approximately 7 cups of water (see “method” below for more information).
Yield: 20 or more servings of 3 medium-sized pancakes.

Method:

Use an electric mixer to beat together all ingredients. When adding the water, make sure to pay attention to the texture of your pancake batter to get the right amount of water. “You want the batter to run off the spoon, with a little imprint left on it. The batter should not be resistant to come off the spoon, nor should it be runny,” Dad explains. Your griddle has to be hot, but not too hot so that you avoid burning the pancakes.  To grease the surface of the griddle, use a good quality margarine, not fluffy tub of margarine or butter. Regardless what others say about using real butter, Dad’s experience is that margarine is not only less expensive than real butter, it also melts more easily and doesn’t burn as readily. Do not try to flip the pancakes, until after the air bubbles that form on the surface of the pancake has burst. “You will be tempted to flip them before the bubbles burst. But do not do it,” Dad warns.

Dad’s advice about prepping and greasing the grill is universal, whatever’s on the breakfast menu. I personally don’t often eat pancakes anymore. Seeing dad was in a good mood today and I didn’t want to push it with an outlandish breakfast order (something I usually do), I requested scrambled eggs. His scrambled eggs are among the fluffiest I’ve ever had and I have to admit I have not been able to replicate his method myself. I asked him to walk me through his method for achieving fluffy and perfect scrambled eggs, so I could explain it to all of you.

Bill’s Fluffy & Perfect Scrambled Eggs

Method:

Add tablespoon of water and beat the eggs very quickly to capture air. Since you are working with a hot grill, the other secret is to spread the eggs with a fork all over the griddle and cook them for less than one minute. Scrambled eggs cook much more quickly than any other style, so keep that in mind if you have a mixed order from the same table, the eggs aren’t on the griddle for more than a minute.

It was a real treat to find Dad in such a cooperative and chatty mood this morning so that I could quiz him about so many of breakfast secrets. He even revealed that he has been experimenting with his scrambled egg methodology and looked up Martha Stewart’s techniques on his iPad.

If you have the luxury of only having scrambled eggs on the menu so that you don’t have to keep your griddle very hot, he suggests that you try Martha’s low-temperature method. Two videos of this method are available here and here.

FullSizeRender

(Above: Although Dad doesn’t encourage adults to place special orders at breakfast, he’s known to produce some really special breakfast treats for the many children that stay at the inn.)

Special breakfast orders aren’t encouraged at the Combes Family Inn, and, frankly, guests issue them at their own risk (refer back to “grumpy” above). Despite this, Dad also revealed some excellent tips on how to make poached eggs. (Disclaimer: If you read this post and then stay at the Inn, please do not mention my name if you dare to order poached eggs.)

Poached eggs

Ingredients:

A pinch of salt.
A tablespoon of vinegar.
2 eggs.

Method:

Use a frying pan with water. Add a little salt and vinegar to the water. Dad says, “The salt is not important, but it helps the water get to a higher temperature. The vinegar, however, is important. It keeps the egg together.” And, he continued, “in terms of timing, I don’t have the time to screw around with a kitchen timer. When I drop the eggs in the softly boiling water, I put the toast down on the toaster. When the toast pops, the poached eggs are done.”

Speaking of the appropriate timing of the different components that go into an egg dish at breakfast, my dad’s number one advice about cooking breakfast is something that I learned in high school and have lived by ever since. With the one exception of poached eggs (as you just learned above), “you always put the toast down first, before putting the eggs on the grill – always,” my father advises, even warns.

Bottom line:  my mom suggests that you listen to the master, because, she proudly claims, “In the winter he can serve breakfast to more than 30 people and get them all on the ski slopes by 8 o’clock.”

We’ve come to the end of this blog post and I haven’t had a chance to explain why we call him the “Vermudgeon.” For that, you’ll have to tune in next week.

IMG_5931

LET THEM EAT CAKE (AGAIN)

Standard

A few weeks ago, we were visiting some of my husband’s family in Maine. For brunch, my sister-in-law made an amazing lobster eggs Benedict. She had made way too much hollandaise sauce than we needed and mused out loud about what could be done with it. I immediately suggested that we call my mother and reached for the phone.

Why call her? You might ask. Because, after serving to dinner guests for over 35 years, my mom knows her way around the kitchen and has many useful tips for saving and re-purposing leftovers. If there’s anyone who knows if hollandaise sauce can be frozen and re-served or repurposed in some other way, it’s my mom. And, the answer? “Hollandaise freezes very well. When you heat it on the stove, stir constantly and add a bit of lemon juice and warm water to help re-constitute it,” Mom advised my sister-in-law.

Lobster Eggs Bennedict

In last week’s blog post, I alluded to two of mom’s other secrets:  which cheeses freeze well and what to do with leftover cake.  As promised, here are all the details, as well as my mom’s recipes to make the most of them.

Just like you might not expect that hollandaise sauce can be successfully frozen and reused, many people shy away from freezing cheese. It is true that the texture changes when you bring it back up to room temperature. For that reason, my mom exclusively uses leftover and frozen cheeses to make her legendary macaroni and cheese recipe. A favorite of kids and adult guests alike, mom is continually asked for this recipe. However, it is truly never the same dish twice! The only type of cheese that my mother won’t freeze is fresh goat cheese. As for the others, she reckons that she’s frozen them all: American, Swiss, Cheddar, and even Brie.

Macaroni & Cheese

Ingredients:
7 ounces elbow macaroni (about 2 cups uncooked)
3 tablespoon butter
3 tablespoon flour
3/4 teaspoon salt
dash pepper
2 cups milk
2 cups shredded cheddar, American or both (or whatever other types of cheese you froze!)
1/4 cup bread crumbs
1 tablespoon melted butter

Method:
Cook macaroni, following directions on package. Rinse in cold water and drain. Melt butter in saucepan, blend in flour, salt, and pepper. Add milk, cook on stovetop, stirring frequently until mixture is thick. Combine 1/2 of cheese mixture and macaroni. Then fold in remaining shredded cheese. Pour into a greased 2-quart casserole dish. Sprinkle the top with crumbs and melted butter. Bake 350 degrees for 30 to 40 minutes, until bubbly and lightly browned on top.

Saving leftover cake to make the dessert called “trifle” is another one of my mom’s guilty secrets.  You can save pretty much any cake and freeze it. Once, she even drove over to another inn to take home the leftovers of an entire wedding cake, when she heard the bride wasn’t keeping it.

According to my mom, “The key is to remove all of the frosting. I think vanilla cake makes the best trifle, but I’ve also done it with chocolate and other flavors.” After removing the frosting, just freeze the chunks or slices or whole pieces of cake in gallon sized freezer bags. You can keep it this way for up to one year.

The recipe for my mom’s cake trifle has never been written down before. That makes this the world premiere of the written record for this most excellent dessert.

Ruth’s Leftover Cake Trifle

Ingredients:
1 pound leftover cake
1 cup fruit-based liquor (mom suggests this cassis from the Putney Mountain Winery)
1 cup jam (mom uses her homemade peach or strawberry jam)
1 package vanilla pudding mix
2 cups fresh berries
Fresh whipped cream

Method:
The day you plan to make the trifle, take the bags of frozen cake pieces out of the freezer and let them come to room temperature. Be sure to wash your hands well and use them to break the cake into approximately one inch cubes and set aside in a large bowl.

Use a large square or rectangular cake pan to assemble two layers of the dessert. Cover the bottom of the pan with cake pieces (only using half of the cake). Add half of the liquor. A fruit-based liquor like cassis, which is made from blackberries, is what mother usually uses. Then layer in the jam. Mix up a package of instant vanilla pudding with one cup of milk or half-and-half, making a custard. Put half over the layer of jam. Repeat all steps so that you have two layers, substituting the fresh fruit on the top, instead of jam. Use whatever fresh berries are in season. Refrigerate until ready to serve.

Just before serving, top each serving with freshly made whip cream (1 cup of heavy cream whipped with a table spoon of powdered confectioner’s sugar and a teaspoon of vanilla). If you don’t use up all of the whipped cream, remember that it also freezes very well!

Although it doesn’t involve previously frozen ingredients, another of Mom’s extremely popular time-saving dessert recipes is her “paper bag apple pie.” She’s been making this for over 25 years. During my interview with Mom this morning, I was so captivated by this recipe, that I goaded her into making it with me today during half-time of the Patriot’s game. I’m not exaggerating when I say that the prep time for this delicious rendition of apple pie is less than 10 minutes.

Paper Bag Apple Pie

Ingredients:
4-5 apples, cored, peeled, and sliced
1 pie shell
1 cup sugar
1/8 teaspoon salt
½ teaspoon cinnamon
5 tablespoon flour
3 tablespoon water, apple cider, or apple juice

Topping:
½ cup brown sugar
½ quick oats
1 stick of margarine or butter
¼ cup chopped nuts (optional)

Method:
Place apples in pie shell. Sprinkle with remaining ingredients. Combine topping ingredients to make a crumbly mixture. Spread on top of apples in pie. Place shell with all ingredients in large brown paper bag. Use either paper clips or stapler to bind airtight. Bake 1 hour at 375°. Serve with vanilla ice cream or whipped cream. Serves 8-10.

Mom making bag apple pie

  Into the bagSeal the bagFinished pie

You can find several of the inn’s other recipes on their website here. If you have any questions about these recipes or the inn’s other kitchen secrets or cooking tips, please post them as comments and we promise to get back to you.